Operators/Tools/Interactive/LabelImageEditor: Difference between revisions
(Created page with "<br/> <br/> == Label Image Editor == <!-- 150px|right|link= 150px|right|link= [[File:ActinDistro.png|150px|ri...") |
|||
| (18 intermediate revisions by the same user not shown) | |||
| Line 3: | Line 3: | ||
== Label Image Editor == | == Label Image Editor == | ||
[[File:LabelImageEditor-MTBOperatorControlFrame.png|400px|right|link=]] | |||
[[File: | |||
The ''Label Image Editor'' is available since release version 1.8.8 of MiToBo.<br/> | The ''Label Image Editor'' is available since release version 1.8.8 of MiToBo.<br/> | ||
In MiToBo/MiToBo plugins releases 1.8.13.1 and 2.1.2 it got rich feature updates. | |||
===== Latest News ===== | ===== Latest News ===== | ||
The | The editor got latest updates in MiToBo/MiToBo plugins 2.1.2 (April 2021). | ||
===== Name of Plugin/Operator ===== | ===== Name of Plugin/Operator ===== | ||
| Line 23: | Line 20: | ||
===== Main features ===== | ===== Main features ===== | ||
* | * images provided in an input folder are subsequently displayed to the user | ||
* regions, i.e. connected components, can be removed by simple mouse-clicks | * regions, i.e. connected components, can be removed and joined by simple mouse-clicks | ||
* additional boundaries can be added by drawing free-hand lines with configurable line width | |||
* region labels can be adjusted to enhance visibility | |||
* region re-labeling is supported to guarantee unique labels | |||
* holes within regions can be filled | |||
* missing regions in terms of small holes can automatically filled in | |||
* support for up to 65535 labels | |||
===== Usage ===== | ===== Usage ===== | ||
The editor is dedicated to the analysis of label images. In a label image each region or connected component, respectively, is assumed to be marked with a unique intensity or color value, i.e. all of its pixels should share this value. | |||
The editor provides various editing functions to remove or join regions within such images.<br><br> | |||
Note that the editor can also handle label images with one-pixel wide black boundaries between regions.<br><br> | |||
The editor takes as input a directory from where the images are loaded one after the other.<br> | |||
Once an image is displayed to the user edit operations can be performed. Afterwards the changes are saved to a new image file and the next label image is read from the given input directory. | |||
<br> | |||
To run the LabelImageEditor perform the following steps: | To run the LabelImageEditor perform the following steps: | ||
* install MiToBo by following the instructions on the [[Installation]] page | * install MiToBo by following the instructions on the [[Installation]] page | ||
* run MiToBo and start the operator runner by selecting the menu item '''''MiToBo Runner''''' from '''''Plugins -> MiToBo''''' | * run MiToBo and start the operator runner by selecting the menu item '''''MiToBo Runner''''' from '''''Plugins -> MiToBo''''' | ||
* in the selection menu navigate to 'de.unihalle.informatik.MiToBo.tool.interactive' and select the operator '''''LabelImageEditor''''' | * in the selection menu navigate to '''de.unihalle.informatik.MiToBo.tool.interactive''' and select the operator '''''LabelImageEditor''''' | ||
This will bring up the operator window of the LabelImageEditor. | This will bring up the operator window of the LabelImageEditor (see figure on the right, top) where the basic configuration parameters can be added. Clicking the "Run" button will open the editor window with the first image loaded (figure on the right, bottom). | ||
<br> | |||
* Input data:<br>The operator reads the contents of a given input image directory and displays all images one after the other to the user. <br>The user can edit the images, i.e. remove labeled regions, by clicking with the left mouse button somewhere into the region to remove.<br> Clicking the "Next" button at the top of the editor window will save the current image to disk and proceed with the next image in the folder. <br><br> | |||
* Output data:<br>For each input image the operator will save a corresponding output image, either in the same folder or a specific output folder if provided.<br> Output images will share the name of the corresponding input image extended with substring "-edited".<br> Note, all images are relabeled automatically before saving to ensure consecutive labels in the resulting edited images. <br> Consecutive labels are a pre-requisite for some other MiToBo tools which can be used in further processing steps, like the [[Applications/FeatureColorMapper|FeatureColorMapper]]. | |||
<br> | |||
* Parameters: | * Parameters: | ||
{|class="wikitable" | {|class="wikitable" | ||
| Line 49: | Line 53: | ||
|Description | |Description | ||
|- | |- | ||
|'' | |''Input Directory'' | ||
|directory | |directory from where the images to process will be loaded | ||
|- | |||
|''File Filter'' | |||
|Optional string to filter image files to be processed. If the string is empty all files are processed. <br>If a non-empty string is provided, files with names not containing the pattern will be skipped.<br> For example, if the string ".tif" is provided, only images ending with ".tif", i.e. in TIFF format, will be considered.<br> The string "cell" would select only images containing the word "cell" somewhere in their names.<br> Note that as string any valid Java regular expression is admissible. See for example [http://www.vogella.com/tutorials/JavaRegularExpressions/article.html this website] for more details on regular expressions. | |||
|- | |||
|''Output directory'' | |||
|optional; edited result label images will be saved to this directory; if not provided the result images will be stored in the input folder | |||
|} | |||
[[File:LabelImageEditor-EditorWindow.png|500px|right|link=]] | |||
<br> | |||
The following table lists all available operations available in the editor window: | |||
{|class="wikitable" | |||
|style="width: 15%;"|Operation | |||
|How to do it | |||
|- | |||
|''remove a region'' | |||
|click with left mouse button somewhere into the region to be removed;<br>the region will then be removed by setting all its pixels to a value of zero | |||
|- | |- | ||
|'' | |''join two regions'' | ||
| | |press 'Shift' and left-click into the first region to remember its label, then release 'Shift' and left-click into the second region;<br>the label of the first region will be transferred to the second region; black pixels between both parts can be removed afterwards using the "Fix borders" button | ||
|- | |- | ||
|'' | |''draw a new boundary'' | ||
| | | keep left mouse button pressed and drag the mouse, this will add a one-pixel wide free-hand line to the label image; note that you can configure the line width via the 'Options' button | ||
|- | |- | ||
|'' | |''fill-in a missing region<br> (new in version 2.1.2)'' | ||
| | |press 'Ctrl' and 'Shift' and left-click into the missing region area; be sure that the area is fully enclosed by other regions, open background sections cannot be filled properly | ||
|} | |||
<br> | |||
The buttons in the editor window have the following functions: | |||
{|class="wikitable" | |||
|Button | |||
|Function | |||
|Keyboard Shortcut | |||
|- | |- | ||
|'' | |''Next'' | ||
| | |save current changes and jump to next image | ||
|''Alt + n'' | |||
|- | |- | ||
|'' | |''Skip'' | ||
| | |cancel current image, don't save anything and jump to next image | ||
|''Alt + s'' | |||
|- | |- | ||
|'' | |''Contrast'' | ||
| | |adjust labels to optimize visibility, i.e., shift labels into upper third of gray-scale range with maximal distances between them | ||
|''Alt + c'' | |||
|- | |- | ||
|'' | |''Relabel'' | ||
| | |relabel the image, i.e., make sure that every region gets a unique label | ||
|''Alt + r'' | |||
|- | |- | ||
|'' | |''Fix Borders'' | ||
| | |remove all background pixels with more than one foreground label in their neighborhood; the size of the neighborhood to be considered can be configured via the 'Options' button, and sometimes it is necessary to re-run the command several times to remove all non-border pixels between two region parts | ||
|''Alt + b'' | |||
|- | |- | ||
|'' | |''Fill Holes'' | ||
| | |fill background regions enclosed by a single region with the region label | ||
|''Alt + h'' | |||
|- | |- | ||
|'' | |''Undo'' | ||
|the | |undo the last action; IMPORTANT: only the most recent action can be undone! | ||
|''Alt + u'' | |||
|- | |- | ||
|'' | |''Options'' | ||
| | |opens a window with configuration options, e.g., for setting the line width in drawing or the maximum boundary width | ||
|''Alt + o'' | |||
|- | |- | ||
|'' | |''Quit'' | ||
| | |save current changes and quit the editor window | ||
|''Alt + q'' | |||
|} | |} | ||
<br><br> | |||
'''Hint:''' The ''Undo'' function has currently only a history of length one. If you accidentally deleted too many regions or want to undo more than one action, either run the editor once again on the complete directory or copy the corresponding image to a separate folder and run the editor on that folder. Results of a former run will be overwritten without further inquiry. | |||
The | |||
=== Updates === | |||
----<br> | |||
'''April 2021''' | |||
* The editor got some updates in MiToBo 2.1.2 and MiToBo-plugins 2.1.2, respectively. Background regions can now be filled-in, more labels are supported and some parameters be configured by the user. | |||
'''January 2019''' | |||
* The editor got a comprehensive update in MiToBo 1.8.13.1 and MiToBo-plugins 1.8.13.1, respectively. There is now much more editing functionality available, e.g., filling holes or drawing of free-hand lines. | |||
* | |||
'''March 2018''' | |||
* The LabelImageEditor has been released in MiToBo 1.8.8 and MiToBo-plugins 1.8.8, respectively.<br><br> | |||
<p> | |||
=== Technical Details === | |||
=== | |||
----<br> | ----<br> | ||
The label editor relies on analyzing and manipulating the grayscale values of segmented regions in a given image.<br> In detail, the most important functions are implemented as follows: | |||
* deleting regions:<br> the grayscale value at the mouse-click position is determined and all pixels in the image sharing this value are set to black | |||
* | * joining regions:<br> upon clicking into the first region its grayscale value is internally stored;<br> when the user clicks into the second region which is to be merged with the first one<br> the grayscale value at the click position is extracted and all pixels with this value are relabeled with the formerly stored grayscale value of the first region;<br> important: after doing the join both joined regions share the same grayscale value, however, are not connected to each other; hence, to get a valid label image again you should run the "Fix Borders" function | ||
* relabel image:<br> the image is thresholded with a threshold of zero to get a binary image of background and labeled regions;<br> then a sequential component labeling is run on the image which assigns consecutive grayscale labels to all connected components in the foreground of the image | |||
* adjust contrast:<br> the image is relabeled, however, the target labels are equidistantly spread over just the upper two third of the available grayscale range;<br> the underlying motivation for this is given by the observation that low grayscale values are hard to distinguish from the background, thus, brighter labels improve visibility | |||
* | * fix borders:<br> this functions seeks to eliminate borders between regions with identical labels which may for example occur after joining two regions;<br> for removing borders for each background pixel in the image the grayscale values in a 7x7 neighborhood of the pixel are analyzed,<br> and if there is only a single grayscale value found and more than half of the analyzed neighborhood pixels share this value, the corresponding background pixel gets the value as well;<br> the neighborhood is currently fixed to 7x7, thus, borders which are wider cannot be closed, and it has to be noted that sometimes the function has to be run several times to remove all pixels belonging to a single border | ||
Latest revision as of 16:26, 9 April 2021
Label Image Editor
The Label Image Editor is available since release version 1.8.8 of MiToBo.
In MiToBo/MiToBo plugins releases 1.8.13.1 and 2.1.2 it got rich feature updates.
Latest News
The editor got latest updates in MiToBo/MiToBo plugins 2.1.2 (April 2021).
Name of Plugin/Operator
de.unihalle.informatik.MiToBo.tools.interactive.LabelImageEditor
(available since MiToBo version 1.8.8)
Main features
- images provided in an input folder are subsequently displayed to the user
- regions, i.e. connected components, can be removed and joined by simple mouse-clicks
- additional boundaries can be added by drawing free-hand lines with configurable line width
- region labels can be adjusted to enhance visibility
- region re-labeling is supported to guarantee unique labels
- holes within regions can be filled
- missing regions in terms of small holes can automatically filled in
- support for up to 65535 labels
Usage
The editor is dedicated to the analysis of label images. In a label image each region or connected component, respectively, is assumed to be marked with a unique intensity or color value, i.e. all of its pixels should share this value.
The editor provides various editing functions to remove or join regions within such images.
Note that the editor can also handle label images with one-pixel wide black boundaries between regions.
The editor takes as input a directory from where the images are loaded one after the other.
Once an image is displayed to the user edit operations can be performed. Afterwards the changes are saved to a new image file and the next label image is read from the given input directory.
To run the LabelImageEditor perform the following steps:
- install MiToBo by following the instructions on the Installation page
- run MiToBo and start the operator runner by selecting the menu item MiToBo Runner from Plugins -> MiToBo
- in the selection menu navigate to de.unihalle.informatik.MiToBo.tool.interactive and select the operator LabelImageEditor
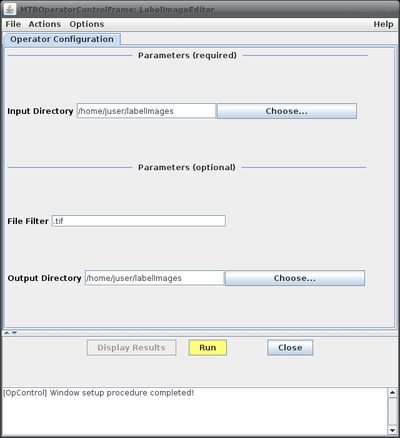
This will bring up the operator window of the LabelImageEditor (see figure on the right, top) where the basic configuration parameters can be added. Clicking the "Run" button will open the editor window with the first image loaded (figure on the right, bottom).
- Input data:
The operator reads the contents of a given input image directory and displays all images one after the other to the user.
The user can edit the images, i.e. remove labeled regions, by clicking with the left mouse button somewhere into the region to remove.
Clicking the "Next" button at the top of the editor window will save the current image to disk and proceed with the next image in the folder. - Output data:
For each input image the operator will save a corresponding output image, either in the same folder or a specific output folder if provided.
Output images will share the name of the corresponding input image extended with substring "-edited".
Note, all images are relabeled automatically before saving to ensure consecutive labels in the resulting edited images.
Consecutive labels are a pre-requisite for some other MiToBo tools which can be used in further processing steps, like the FeatureColorMapper.
- Parameters:
| Name | Description |
| Input Directory | directory from where the images to process will be loaded |
| File Filter | Optional string to filter image files to be processed. If the string is empty all files are processed. If a non-empty string is provided, files with names not containing the pattern will be skipped. For example, if the string ".tif" is provided, only images ending with ".tif", i.e. in TIFF format, will be considered. The string "cell" would select only images containing the word "cell" somewhere in their names. Note that as string any valid Java regular expression is admissible. See for example this website for more details on regular expressions. |
| Output directory | optional; edited result label images will be saved to this directory; if not provided the result images will be stored in the input folder |
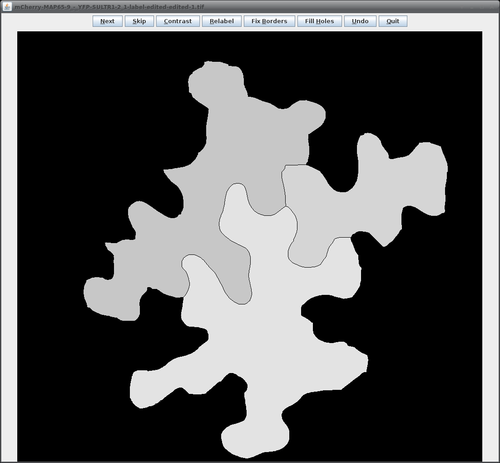
The following table lists all available operations available in the editor window:
| Operation | How to do it |
| remove a region | click with left mouse button somewhere into the region to be removed; the region will then be removed by setting all its pixels to a value of zero |
| join two regions | press 'Shift' and left-click into the first region to remember its label, then release 'Shift' and left-click into the second region; the label of the first region will be transferred to the second region; black pixels between both parts can be removed afterwards using the "Fix borders" button |
| draw a new boundary | keep left mouse button pressed and drag the mouse, this will add a one-pixel wide free-hand line to the label image; note that you can configure the line width via the 'Options' button |
| fill-in a missing region (new in version 2.1.2) |
press 'Ctrl' and 'Shift' and left-click into the missing region area; be sure that the area is fully enclosed by other regions, open background sections cannot be filled properly |
The buttons in the editor window have the following functions:
| Button | Function | Keyboard Shortcut |
| Next | save current changes and jump to next image | Alt + n |
| Skip | cancel current image, don't save anything and jump to next image | Alt + s |
| Contrast | adjust labels to optimize visibility, i.e., shift labels into upper third of gray-scale range with maximal distances between them | Alt + c |
| Relabel | relabel the image, i.e., make sure that every region gets a unique label | Alt + r |
| Fix Borders | remove all background pixels with more than one foreground label in their neighborhood; the size of the neighborhood to be considered can be configured via the 'Options' button, and sometimes it is necessary to re-run the command several times to remove all non-border pixels between two region parts | Alt + b |
| Fill Holes | fill background regions enclosed by a single region with the region label | Alt + h |
| Undo | undo the last action; IMPORTANT: only the most recent action can be undone! | Alt + u |
| Options | opens a window with configuration options, e.g., for setting the line width in drawing or the maximum boundary width | Alt + o |
| Quit | save current changes and quit the editor window | Alt + q |
Hint: The Undo function has currently only a history of length one. If you accidentally deleted too many regions or want to undo more than one action, either run the editor once again on the complete directory or copy the corresponding image to a separate folder and run the editor on that folder. Results of a former run will be overwritten without further inquiry.
Updates
April 2021
- The editor got some updates in MiToBo 2.1.2 and MiToBo-plugins 2.1.2, respectively. Background regions can now be filled-in, more labels are supported and some parameters be configured by the user.
January 2019
- The editor got a comprehensive update in MiToBo 1.8.13.1 and MiToBo-plugins 1.8.13.1, respectively. There is now much more editing functionality available, e.g., filling holes or drawing of free-hand lines.
March 2018
- The LabelImageEditor has been released in MiToBo 1.8.8 and MiToBo-plugins 1.8.8, respectively.
Technical Details
The label editor relies on analyzing and manipulating the grayscale values of segmented regions in a given image.
In detail, the most important functions are implemented as follows:
- deleting regions:
the grayscale value at the mouse-click position is determined and all pixels in the image sharing this value are set to black - joining regions:
upon clicking into the first region its grayscale value is internally stored;
when the user clicks into the second region which is to be merged with the first one
the grayscale value at the click position is extracted and all pixels with this value are relabeled with the formerly stored grayscale value of the first region;
important: after doing the join both joined regions share the same grayscale value, however, are not connected to each other; hence, to get a valid label image again you should run the "Fix Borders" function - relabel image:
the image is thresholded with a threshold of zero to get a binary image of background and labeled regions;
then a sequential component labeling is run on the image which assigns consecutive grayscale labels to all connected components in the foreground of the image - adjust contrast:
the image is relabeled, however, the target labels are equidistantly spread over just the upper two third of the available grayscale range;
the underlying motivation for this is given by the observation that low grayscale values are hard to distinguish from the background, thus, brighter labels improve visibility - fix borders:
this functions seeks to eliminate borders between regions with identical labels which may for example occur after joining two regions;
for removing borders for each background pixel in the image the grayscale values in a 7x7 neighborhood of the pixel are analyzed,
and if there is only a single grayscale value found and more than half of the analyzed neighborhood pixels share this value, the corresponding background pixel gets the value as well;
the neighborhood is currently fixed to 7x7, thus, borders which are wider cannot be closed, and it has to be noted that sometimes the function has to be run several times to remove all pixels belonging to a single border