Applications/MTBCellCounter
MTB Cell Counter

The MTB Cell Counter plugin is dedicated to semi-automatic labeling and counting of small structures in images, like spots or cells. It is based upon the original Cell Counter plugin for ImageJ written by Kurt De Vos (Cell Counter) and now also available in Fiji. Compared to the original version the MTB_CellCounter plugin adds some nice new features:
- pre-segmentation and filtering of various structures
- free configuration of marker colors
- advanced editing of markers
- status bar, tooltips and keyboard shortcuts
News
In MiToBo 1.8.9 the plugin got an update. On the one hand its architecture was modified to support easy integration of additional segmentation operators, and on the other hand its usability was improved. Each type of marker can now individually be filtered for average intensity and size, and for new markers manually added by the user now also a region in terms of the surrounding contour can be specified.
Below you will find the updated documentation for the new version. Note that important new functionality is highlighted below.
Documentation for the old version (available in MiToBo 1.8.8 and earlier) is still available here.
Related Publications
- L. Franke, B. Storbeck, J. L. Erickson, D. Rödel, D. Schröter, B. Möller, and M. H. Schattat. The 'MTB Cell Counter' a versatile tool for the semi-automated quantification of sub-cellular phenotypes in fluorescence microscopy images. A case study on plastids, nuclei and peroxisomes. Journal of Endocytobiosis and Cell Research, 26:31-42, 2015, Online version.
Name of MiToBo Plugin/Operator
mtb_cellcounter.MTB_CellCounter
(version 1.0 is available in MiToBo-Plugins since version 1.5, an updated version was released in MiToBo/MiToBo-Plugins 1.8.9)
Installation and Usage
Download and Installation
The easiest way to start working with the plugin is to install it in Fiji via MiToBo's update site.
From the Fiji menu select "Help" -> "Update...", then wait until the updater checked the status of your installation. Afterwards select "Manage update sites" from the updater window and select "MiToBo". Close and cancel all windows and restart Fiji. After the restart you will find the MTBCellCounter via "Plugins" -> "MiToBo", and finally "MTBCellCounter".
For a quick start in ImageJ (not Fiji) you best download the MiToBo-Plugins zip file from here. On Linux and Mac OS systems just unzip the file in an empty directory of your choice and start ImageJ by running the "run.sh" script included in the zip file. On Windows machines it is easiest to first install ImageJ or Fiji and then follow the instructions given here.
Further information on how to install MiToBo in general can be found on the Installation page.
Once MiToBo is installed, you can start the MTB_CellCounter from the "Plugins" menu, item "MiToBo", then "MTB CellCounter".
Usage
The usage of the plugin is leaned on the usage of the original CellCounter plugin (see also Cell Counter webpage), but extended with additional preprocessing steps to pre-segment objects of interest in the image.
The basic workflow is as follows:
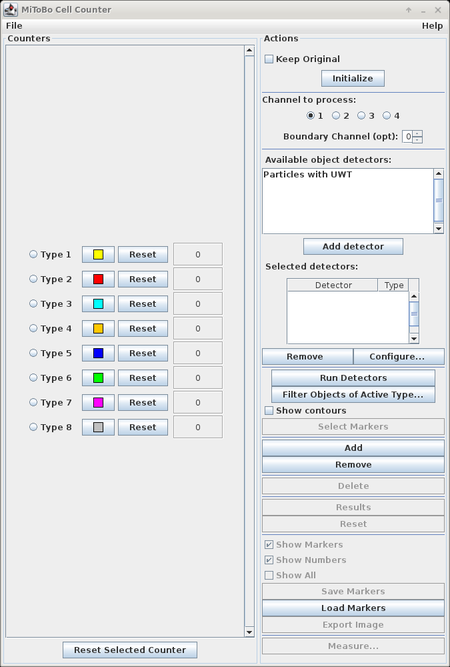
- open the image you would like to process and press the "Initialize" button
- optionally select one or many of the available object detectors, configure each detector individually, and then press "Run Detectors"
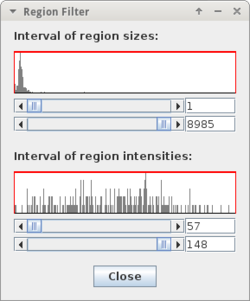
- once the detection is finished you can filter detected objects by size and average intensity for each marker type separately using the "Filter Objects of Active Type..." button;
if you are done, press "Select Markers" - now markers can manually be edited, i.e. markers (and corresponding contours) can be added or removed, or their type can be changed
- at the end you can view marker statistics (button "Results"), save the markers to a file (button "Save Markers") or do some measurements (button "Measurements...")
Functions and Options
Below we outline the functions of the various elements of the graphical user interface.
- Initialization:
- "Initialize": initializes the plugin with the currently active image
- "Keep original": if checked the source image remains open, otherwise it is closed
- Configuration of input image:
- "Channel to process": here you can select on which channel your are going to work if your image has more than one channel; note that you can freely switch between the channels while labeling your objects
- "Boundary Channel (opt)": for labeling sub-cellular objects it is possible to overlay the image with cell contours for easier orientation;
the contours have to be provided in binary format in one of the channels of the input image where the background should have zero intensity and the boundaries be labeled with a unique intensity or color value greater than zero

- Pre-segmentation:
- "Add detector": will add the selected detector to the set of "Selected detectors"; you can select a detector from the list of "Available object detectors" by clicking on its entry
- "Remove": will remove the selected detector from the list of "Selected detectors"; you can select a detector from the list of "Selected detectors" by clicking on its entry
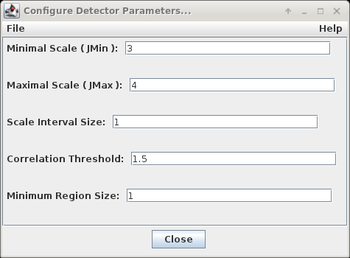
- "Configure...": allows to change the parameters of the detector currently selected (see below)
- "Run Detectors": will apply all selected detectors to the currently selected channel of the input image
- "Filter Objects of Active Type...": allows to filter detection results of the currently selected type for size and average intensity
- "Show contours": enables/disables display of the contours of detected particle regions
- "Select Markers": selects the final set of markers (after running detectors and filtering results) and terminates detection stage
Note that for each "Selected detector" you need to specify a marker type, i.e. an index between 1 and the number of available counters on the left.
Objects detected by the corresponding detector will be labeled with the selected type.
In case that there exist already markers of that type, you will get a warning that all existing markers will get lost on running the detector.
- Marker management and editing:
- "Add": adds a new marker type (also named "counter") to the end of the list, the new counter gets a random color
- "Remove": deletes the last counter (and all of its markers) from the end of the list
- "Delete": deletes the last placed marker
- "Reset": deletes all markers
- "Show Markers": enables/disables display of markers
- "Show Numbers": enables/disables display of marker numbers
- "Show All": enables/disables display of both markers and numbers
Note that the currently selected marker type and the settings for showing markers and numbers are also displayed in the status bar of the image window.
Some additional actions for editing markers are available via keyboard shortcuts and mouse actions only, see below.
- Results:
- "Results": shows table with marker statistics
- "Save Markers": saves the markers to an XML file
- "Load Markers": loads markers from an XML file
- "Export Image": save a copy of the image including all markers
Keyboard Shortcuts and Mouse Actions
| Key | Description |
| 1-9 | select the corresponding marker type |
| a or left arrow | scroll image to the left |
| d or right arrow | scroll image to the right |
| e | zoom out |
| q | zoom in |
| s or arrow down | scroll downwards |
| w or arrow up | scroll upwards |
| v | enable/disable display of contours (only after detected markers are selected) |
| x | enable/disable display of numbers |
| y | enable/disable display of markers |
In edit mode the following mouse actions are available:
- left mouse button: place a new marker of currently selected type
- right mouse button: delete nearest marker of currently selected type
- Strg + left mouse button: change type of nearest marker (with a different type) to currently selected type
- Shift + left mouse button: draw a closed region of interest, all markers inside the region are removed
- Shift + Ctrl + left mouse button: add a new marker (for a region) by drawing its contour
Available Detectors
For detecting structures in the image the plugin provides a set of detectors which are described in more detail below.
Particles with UWT

For the pre-segmentation of spot-like structures a particle detector operator available in the core of MiToBo is used. It has been published in
O. Greß, B. Möller, N. Stöhr, S. Hüttelmaier and S. Posch,
Scale-adaptive Wavelet-based Particle Detection in Microscopy Images,
Proc. of Workshop Bildverarbeitung für die Medizin (BVM '10), Hans-Peter Meinzer, Thomas Martin Deserno, Heinz Handels, and Thomas Tolxdorff, editors,
Springer, Informatik Aktuell, pp. 266-270, Aachen, Germany, March 2010.
The operator targets at spot-like structures over multiple scales. It basically relies on an undecimated wavelet transformation (UWT) combined with a probabilistic framework to determine for each detection event the optimal scale. The operator offers the following parameters:
| Name | Description |
| Minimal Scale (JMin) | scale of smallest objects, set to an integer value >= 1 |
| Maximal Scale (JMax) | scale of largest objects, set to an integer value > JMin |
| Scale Interval Size | several adjacent scales are correlated, the interval size determines how many scales are considered for each correlation |
| Correlation Threshold | threshold for detecting objects, the smaller the threshold is chosen the more objects will be detected |
| Minimum Region Size | minimal size of valid objects (in pixels), smaller objects are discarded |
Sample data
For testing you can use the following set of sample images: